Nashville Hot Chicken Sandwich
It’s finally here! Our Nashville Hot Chicken Sandwich recipe has arrived, and she is a beauty. The chicken turns out so juicy and tender and truly next level. You can add spice or take this spicy chicken recipe down a notch depending on your personal preferences. (And gluten-free friends, have no fear! We used gluten-free flour for the dredge, and you can find a fabulous gluten-free bun to join in the fun!)

I had been cooking up this idea for months, and it was time well spent. It’s delicious and fun to eat!
What You Need To Cook Your Nashville Hot Chicken
Ingredients
- Boneless, skinless chicken breasts or thighs
- Flour, gluten-free or regular
- Eggs
- Milk
- Hot Sauce
- Cayenne
- Garlic & Onion Powder
- Butter
- White Vinegar
- Honey
- Cabbage
- Mayo
- Green Onions
- Pickles
- Brioche Buns, or gluten free
How To Make Your Chicken Sandwich
First, Make Your Slaw
In a small bowl, combine the mayonnaise and vinegar and stir. This will thin the mayo enough to stir in easily to the slaw. In large bowl, toss the cabbage, mayonnaise mixture, scallions, salt and pepper together and refrigerate.
Second, Make the Fried Chicken
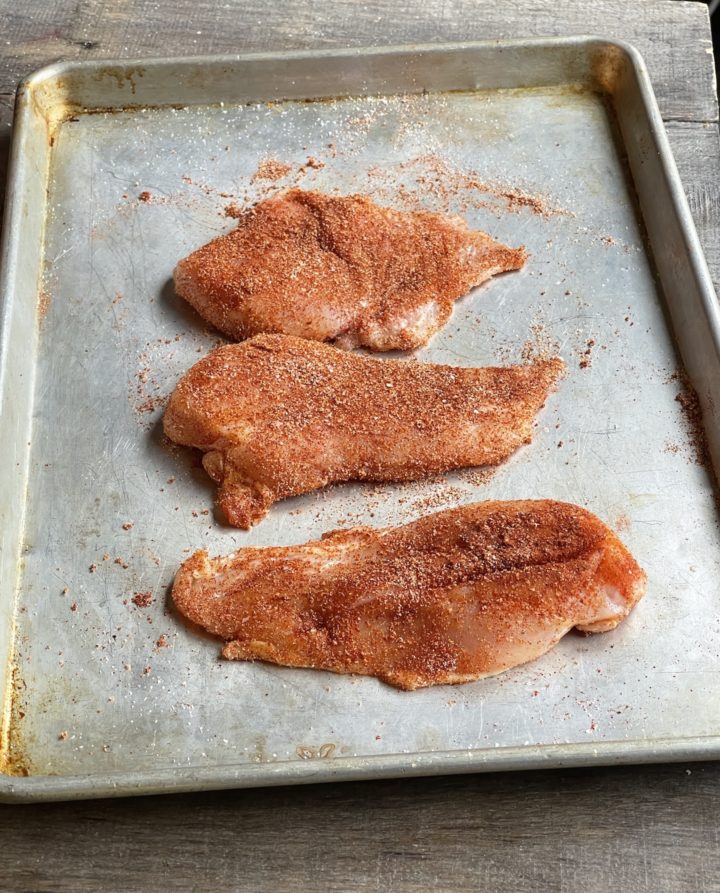
On a sheet tray, lay out the chicken breasts and pat dry. Let them come up to room temperature on your counter for about 30 minutes. Season both sides of each breast, with ½ teaspoon of salt per breast. Combine the 4 teaspoons of cayenne and 2 teaspoons of garlic powder and season both sides of the chicken breasts with this blend. I like to salt them individually because I like to know that each piece is perfectly salted. This way I avoid having some pieces under salted and some over salted.
In a wide, shallow bowl mix the eggs, milk, and hot sauce. Add the flour to another baking dish or large, shallow bowl. With your designated dry hand, dredge the chicken breasts, one at a time, in the flour, making sure both sides are coated. With your other hand, dip the breasts in the egg mixture. Make sure both sides are dipped, and return to the flour. With your dry hand, dredge the breast again, fully coating the breast, and return the breast to the sheet tray. Repeat with remaining chicken breasts.
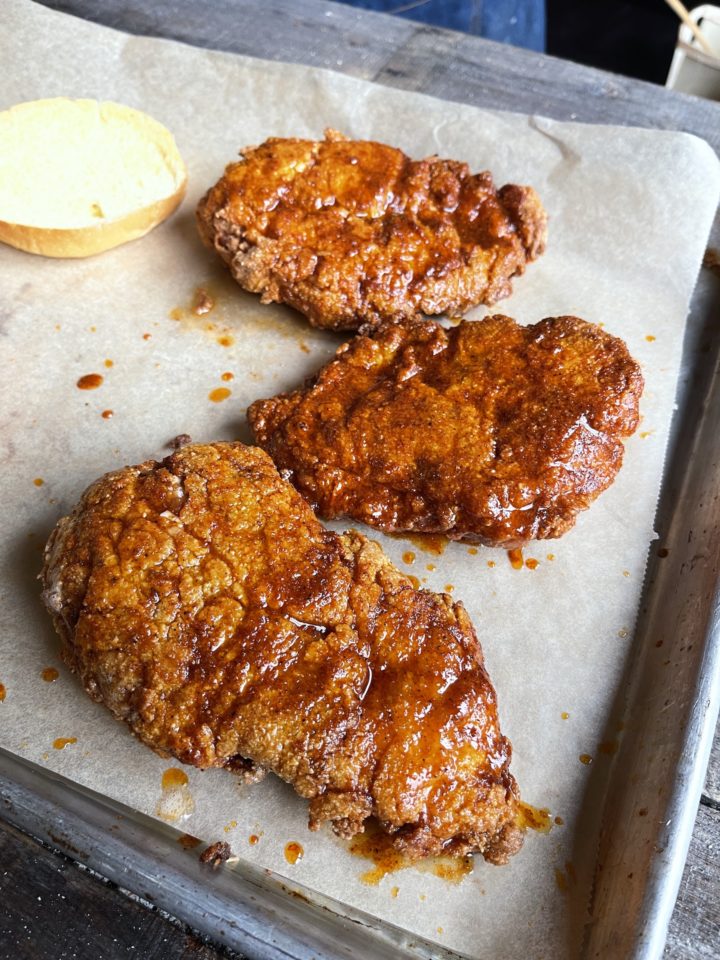
In a large nonstick skillet, add about 1 to 2 inches of oil, which for us ended up being about 3 cups, and heat over medium high. Heat the oil until it is hot and shimmering but not smoking. If you have a thermometer, you want the oil to be 350°F. Once the oil is hot enough, fry one breast to test the oil. You’ll want to fry the breast for about 5 or 6 minutes, flipping halfway through, until it is brown and crispy and about 165°F. Set aside on a rack lined sheet tray or a paper towel lined plate.
If the test breast is fried well and the oil isn’t too hot, repeat with the remaining chicken breasts in batches so as not to overcrowd the pan, otherwise adjust your heat level before proceeding. Everyone’s pans and stoves are different, that’s why it is important to test your cooking environment and make sure you’re getting the results you want.
Third, Make Your Sauce and Assemble
In a small saucepan, melt the butter over medium and add all of the remaining ingredients for the sauce. Stir very well, turn off heat and set aside. Warm the buns in the oven.
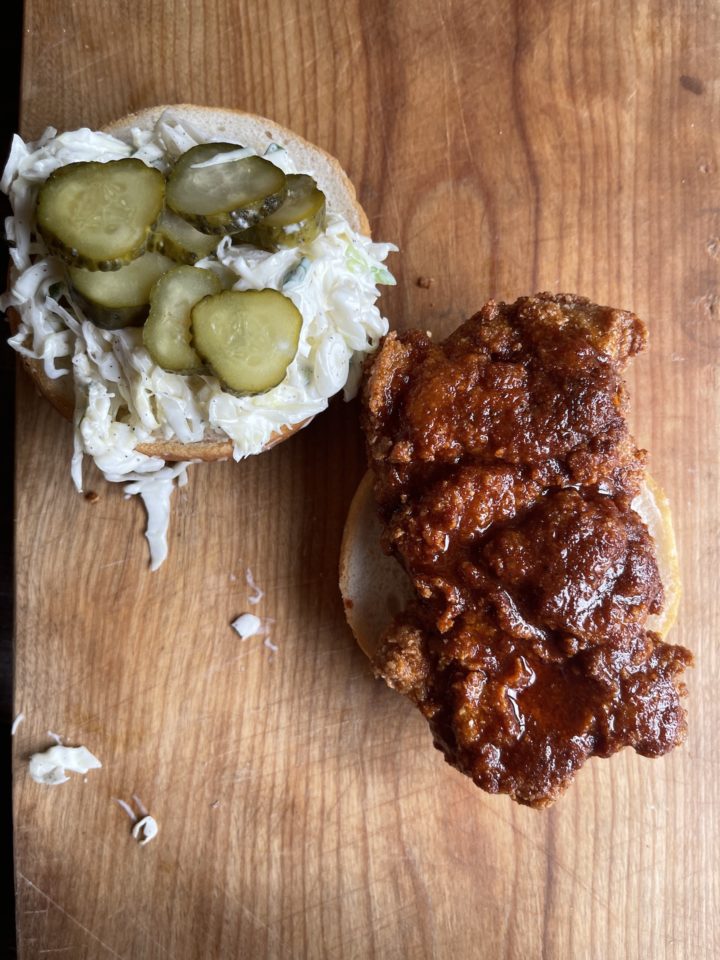
For each sandwich, you are going to slather the sauce on both sides of a fried chicken breast. Place the breast on the bottom half of a bun, top with a couple of pickles and top with coleslaw to your liking. Close the sandwich with the top bun and repeat with the remaining sandwiches. Serve and enjoy!
When you make this Nashville Hot Chicken Sandwich, be sure you rate and review it below. I can’t wait to hear what you think and what fun ways you make it your own. If you’re looking for more inspiration, sign up for our Friday Favorites newsletter, and follow along on Pinterest, Instagram, and TikTok to join in all the fun!
Print
Nashville Hot Chicken Sandwich
- Prep Time: 15 minutes
- Cook Time: 30 minutes
- Total Time: 45 minutes
- Yield: 6-8 sandwiches
- Category: Sandwich
- Method: Stovetop
- Diet: Gluten Free
Description
This Nashville Hot Chicken Sandwich is next level delicious! It can be made gluten free or regular, and it is an absolute crowd pleaser.
Ingredients
For the slaw
- 5 cups shredded white cabbage
- ½ cup mayonnaise, plus more if needed
- ? cup chopped scallions
- 1 tablespoon apple cider vinegar
- 1 teaspoon salt
- ½ teaspoon ground black pepper
For the fried chicken
- 2 cups Bob’s Red Mill Paleo Baking Flour or regular flour
- 2 eggs
- 2 tablespoons milk
- 1 teaspoon hot sauce
- 8 boneless, skinless chicken breasts (or thighs)
- 4 teaspoons cayenne
- 2 teaspoons garlic powder
- 4 teaspoons kosher salt
- 3 cups of light olive oil (we used a medium bottle)
For the sauce
- 1 stick unsalted butter
- 1 tablespoon cayenne
- ½ tablespoon hot paprika
- 1 teaspoon garlic powder
- ½ teaspoon onion powder
- ½ teaspoon kosher salt
- ¼ teaspoon ground pepper
- 2 tablespoons white vinegar
- 1 tablespoon honey
For the sandwich
- 8 brioche or soft gluten-free or regular buns*
- Dill pickles
*Trader Joe’s gluten free buns are fabulous
Instructions
Make the slaw:
- In a small bowl, combine the mayonnaise and vinegar and stir. This will thin the mayo enough to stir in easily to the slaw. In large bowl, toss the cabbage, mayonnaise mixture, scallions, salt and pepper together and refrigerate.
Make the fried chicken:
- On a sheet tray, lay out the chicken breasts and pat dry. Let them come up to room temperature on your counter for about 30 minutes.
- Season both sides of each breast, with ½ teaspoon of salt per breast. Combine the 4 teaspoons of cayenne and 2 teaspoons of garlic powder and season both sides of the chicken breasts with this blend. I like to individually salt the breasts because I like to know that each piece is perfectly salted. This way I avoid having some pieces under salted and some over salted.
- In a wide, shallow bowl mix the eggs, milk, and hot sauce.
- Add the flour to another baking dish or large, shallow bowl.
- With your designated dry hand, dredge the chicken breasts, one at a time, in the flour, making sure both sides are coated. With your other hand, dip the breast in the egg mixture, making sure both sides are dipped, and return to the flour. With your dry hand, dredge the breast again, fully coating the breast, and return the breast to the sheet tray. Repeat with remaining chicken breasts.
- In a large nonstick skillet, add about 1 to 2 inches of oil, which for us ended up being about 3 cups, and heat over medium high. Heat the oil until it is hot and shimmering but not smoking. If you have a thermometer, you want the oil to be 350°F.
- Once the oil is hot enough, fry one breast to test the oil. You’ll want to fry the breast for about 5 or 6 minutes, flipping halfway through, until it is brown and crispy and about 165°F. Set aside on a rack lined sheet tray or a paper towel lined plate.
- If the test breast is fried well and the oil isn’t too hot, repeat with the remaining chicken breasts in batches so as not to overcrowd the pan, otherwise adjust your heat level before proceeding. Everyone’s pans and stoves are different, that’s why it is important to test your cooking environment and make sure you’re getting the results you want.
Make the sauce:
- In a small saucepan, melt the butter over medium and add all of the remaining ingredients for the sauce. Stir very well, turn off heat and set aside.
Assemble the sandwich:
- Toast the buns (watch closely, as brioche burns quickly) or warm them in the oven.
- For each sandwich, you are going to slather the sauce on both sides of a fried chicken breast. Place the breast on the bottom half of a bun, top with a couple of pickles and top with coleslaw to your liking. Close the sandwich with the top bun and repeat with the remaining sandwiches.
- Serve and enjoy!
Looks so delicious – I gotta make it! I’m opting for chicken thighs and I’ll give an almond flour breading a go!
This recipe was phenomenal! I did not have enough oil to fry the chicken so relief on my air frier and the chicken still turned out amazing. Can’t wait to restock on oil and fry them as directed in the recipe. Thanks, Teri, for yet another amazing recipe!
I was thinking the air fryer would be a good option. What temp did you use and how long did you air fry them?
This was fabulous! I usually avoid frying anything breaded because I always lose half the breading to the pan but it was perfect this time! And the flavor? Oh gosh it was good ! Making again and again…
These were phenomenal! The whole family loved them.
I was wondering about the air fryer. Has anyone tried this recipe in the air fryer? What temp and how long?
Pingback: Gluten-Free & Fabulous! The Best Fried Fish Sandwich with Tartar Sauce - nocrumbsleft
Absolutely delicious. Made it with both thighs and breasts. Definitely a keeper.
Pingback: The Best Chicken Finger Recipe and How I Love to Serve It! - nocrumbsleft
Pingback: Thanksgiving Style Chicken for a Smaller Group - nocrumbsleft
Omgsh. This might change my life. ? we always get carry out chicken on race day (indianapolis 500) and being gluten free I don’t get to enjoy. This year. Game changer. No one knew it was gluten free it’s so delish. Thanks Teri ??
And Teri!!! Not ?? ?
Pingback: Crack the Code of the Ultimate Tuna Melt Sandwich! - nocrumbsleft
Just made it for friends last night. I made the sauce and cold slaw earlier. I didn’t fry the chicken in as much oil as recipe called. I also didn’t cook all the way through and popped in oven to fully cook when ready to serve. Everyone loved them. I loved that I could enjoy being with my friends instead of in the kitchen. I served with sweet potato fries:)
These are amazing. Sweet & Spicy sauce, crispy chicken, zingy slaw all on a brioche bun. I would have licked the plate if I was alone 🙂 All 4 of us loved them. We are having them again today on Mother’s Day. Thank you for this great recipe!