Friday Favorites Recipes
Patrick’s Chicken Fingers
Print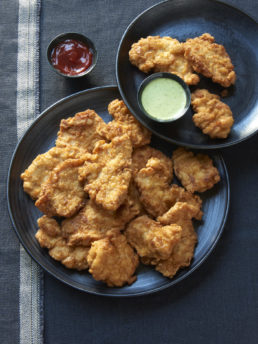
Patrick’s Chicken Fingers
- Prep Time: 10 min
- Cook Time: 20 min
- Total Time: 30 min
Ingredients
2 large boneless, skinless chicken breasts
1 teaspoon kosher salt
¼ teaspoon freshly ground black pepper
2 large eggs
2 tablespoons milk
1 cup all-purpose flour (if gluten-free, use Cup4Cup flour)
1 cup vegetable oil
Instructions
Cut each chicken breast crosswise on an angle into 10 strips. Season the strips with the salt and pepper. Set aside.
Beat the eggs and milk together until the striations are gone, then pour them into a shallow, rimmed dish. Put the flour in a separate shallow, rimmed dish.
One by one, thoroughly cover each chicken strip in flour, then dredge in the egg, then remove and gently drop into the flour, covering thoroughly. Handling each chicken finger as minimally as possible, shake off any excess flour and set aside on a plate.
In a medium skillet over high heat, heat the vegetable oil until hot but not smoking (you can test with a corner of the chicken to see if it audibly sizzles). Reduce the heat to medium-high. Working in batches, Fry the chicken strips in the hot oil until golden brown, about 2 to 3 minutes, flipping them halfway through. Transfer to a tea towel-lined plate to drain. Repeat to cook the remaining chicken strips. Serve.
Notes
- You can prep by cutting the chicken in the morning, lightly seasoning with salt and pepper and putting it in fridge. And you can change them up by using fish rather than chicken.
- Grain-free flours are different than regular, all-purpose flours and can burn quicker. S0 figuring out the right oil temperature is key in making this recipe a success.
- When frying the chicken fingers, don’t overcrowd your pan. If you do start with several in your pan at once, turn the temperature up, as the oil will cool down quicker when you start with more in the pan.
- For anyone allergic to nuts, use coconut flour instead, and vice versa.
- If you want perfect chicken fingers, change your oil in-between every batch.
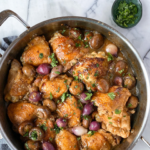
Hunter’s Chicken
I am so excited to share my Hunter’s Chicken with you. It is filled with onions, shallots, mushrooms and has a savory pan gravy. Rich and flavorful, it’s perfect for a Sunday dinner in the middle of winter! Although this recipe isn’t complicated, it does require some finesse, but it is worth it!! Let’s go!
Print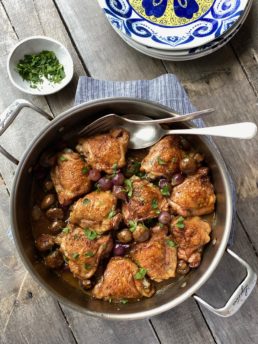
Hunter’s Chicken
- Prep Time: 15 min
- Cook Time: 1 hr
- Total Time: 1 hr 15 min
- Yield: 4 servings
Ingredients
2–½ teaspoon kosher salt, divided
¾ teaspoon freshly ground black pepper
3 tablespoons extra virgin olive oil, divided
3 slices bacon to render 3 tablespoons of bacon fat (you can use 3 tablespoons olive oil if you prefer)
10 oz whole baby bella mushrooms (stem intact, ends trimmed)
1 cup sliced shallots
1 cup peeled pearl onions (you can use frozen, or 1 medium red onion, if you choose)
4 cloves garlic, crushed
8-10 bone-in, skin-on chicken thighs (depending on size)
1-½ cups + 2 tablespoons chicken stock, warmed
2 tablespoons sherry vinegar
1 tablespoon arrowroot
2 tablespoons cold water
Instructions
Preheat the oven to 350° F.
Sprinkle 2 tsp of salt and ¾ tsp black pepper evenly over the chicken.
In a large, oven safe sauté pan or skillet, over medium high heat, heat 2 Tbsp olive oil. Add the bacon and cook until crisp. Using a slotted spoon, remove the bacon from the pan, leaving about 3 Tbsp bacon fat.
In the same pan, add 1 Tbsp olive oil to the bacon fat. Add the chicken thighs, skin down, and sear until golden brown and crispy, about 4 ½ to 5 minutes. Using tongs, turn thighs over and cook until golden brown, about 3 ½ to 4 minutes. Reserving the fat and drippings from the pan, remove the chicken thighs and set aside in a medium sized bowl. Measure 3 Tbsp of the reserved fat and add back to the pan. Set the remainder aside.
In the same pan, add the mushrooms and stir well to coat. Add 2 Tbsp of chicken stock to the pan to deglaze, using a wooden spoon to scrape the bits off the bottom of the pan. Cover the pan and cook 2 minutes. Remove the cover, add the remaining ½ tsp salt, and cook uncovered for an additional 4 minutes.
Measure 1 Tbsp of the set-aside reserved fat and add to the pan. Add the shallots and cook until translucent and golden brown, about 3 minutes. Add the garlic and cook 1 more minute. Add 1 cup of warm stock to the pan. Using a wooden spoon, continue scraping the bottom to deglaze.
Place the chicken (and any accumulated juices) on top of the mushrooms and shallots. Add the remaining ½ cup chicken stock around the edge of the pan (make sure the liquid is not higher than the layer of mushrooms).
In a medium sized bowl, drizzle the onions with a little bit of olive oil, tossing to coat. Place them all around the pan with the chicken and mushrooms.
Place the pan in the oven and cook, uncovered, 30 minutes. (If the chicken is not golden brown, cook for an additional 10 minutes.)
Increase the oven temperature to 400°F for 10 minutes, or until the chicken is brown and crispy. Remove the pan from the oven and place on the stove. Using tongs, remove chicken from the pan and set aside in the same bowl used earlier.
Add the sherry vinegar to the pan. Make a slurry with the arrowroot and water and add to the pan. Return to medium low heat and, stirring constantly, cook the sauce to thicken, about 1 minute. Return the chicken to the pan. Serve!